
Installation
Download
Download the required files from the Github repository:
Download the repository as zip file on your local disk by pressing the green button “code” and then extract the zip file for working with the contained folder.
One convenient method is to save the file in the D: Drive if you use Windows.
In any case, make sure you know the path to this directory. You need to enter it in the DD application (“Working git directory”).
Prerequisites
- RStudio (available for free download here)
Make sure that you have the latest version installed.
- Miniconda (available for free download)here
The Miniconda installation guide advises against adding Miniconda to your system’s PATH during installation. However, the Distribution Digitizer tool relies on environment variables to function correctly for now. Adding Miniconda to the PATH allows your system to locate and use the Miniconda commands directly from any directory. Without this, the Distribution Digitizer tool might not work properly because it won’t be able to find the necessary dependencies or tools provided by Miniconda. This means that for the tool to work as expected, you need to have Miniconda accessible via your system’s PATH.
What to Do: During the installation of Miniconda, select the “Add Miniconda to my PATH environment variable” option. This will automatically configure your system to recognize Miniconda commands without additional setup. If you choose not to add it during installation, you can configure it manually by editing your system’s PATH environment variable.
How to Add Miniconda to Your PATH in Windows
- Locate Your Miniconda Installation Directory By default, Miniconda is installed in a directory such as: C:\Users<YourUsername>\Miniconda3
- Press Win + S, type Environment Variables, and select Edit the system environment variables.
- In the System Properties window that opens, click the Environment Variables… button at the bottom.
- Edit the PATH Variable In the Environment Variables window, under System Variables, find the variable named Path and select it. Click Edit….
- In the Edit Environment Variable window, click New.
- Add the following path C:\Users<YourUsername>\Miniconda3
- Click OK to close all windows.
Verify the PATH Update Open a new Command Prompt window (close any existing ones first to load the new PATH). Type conda –version. If Miniconda is correctly added to your PATH, this command will show the installed version of Conda.
- Tesseract (available free for download)here Tesseract is a Software for text recognition. Distribution digitizer uses it to detect species names.
Again, add tesseract to your PATH.
First steps
After installing the prerequierd programs and unzipped the distribution digitizer folder, open the start_dd_app file.
- The Digitizer makes use of additional functions from several R packages and Pyhon moduls.
Run these commands for that:
py_install(packages = "opencv", pip = FALSE) #used for map matching
py_install(packages = "pillow", pip = FALSE)
py_install(packages = "tesseract", pip = FALSE)
py_install(packages = "pandas", pip = FALSE)
py_install(packages = "GDAL", pip = FALSE)
py_install(packages = "imutils", pip = FALSE)
py_install(packages = "rasterio", pip = FALSE)
py_install(packages = "geopandas", pip = FALSE)
Installing all theses depencencies might take a while. After installation, you can de-activate the code by adding a “#” in front of those lines. It won’t be needed after all packages have been installed.
#py_install(packages = "opencv", pip = FALSE) #used for map matching
#py_install(packages = "pillow", pip = FALSE)
#py_install(packages = "tesseract", pip = FALSE)
#py_install(packages = "pandas", pip = FALSE)
#py_install(packages = "GDAL", pip = FALSE)
#py_install(packages = "imutils", pip = FALSE)
#py_install(packages = "rasterio", pip = FALSE)
#py_install(packages = "geopandas", pip = FALSE)
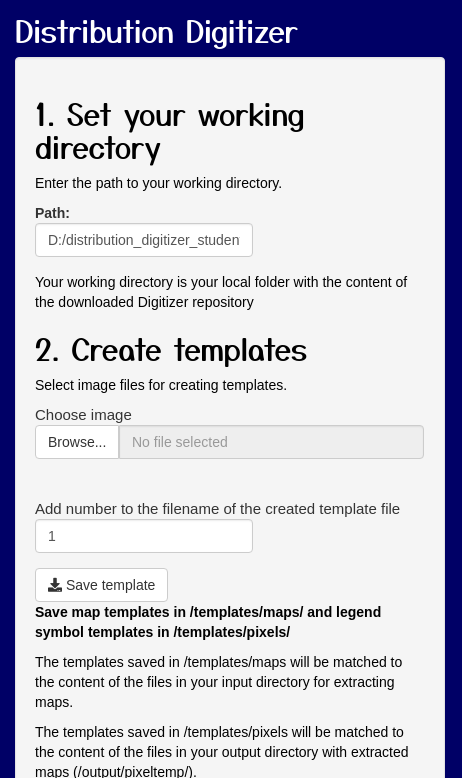
- Set your working directory
The working directory is the path to the folder with your downloaded files.
This path must be set to the folder containing for being able to execute the shiny app. By default, “app.R” lies at the root of this repository.
In RStudio, the path to the working directory can be set automatically with
setwd(dirname(rstudioapi::getActiveDocumentContext()$path))
or manually with a path of your choice:
setwd("D:/distribution_digitizer_students-main/") # uncomment this line for setting the working directory manually.
- R Packages “shiny” and “reticulate”
Install them with
install.packages(c("shiny", "reticulate"))
Start the Digitizer
After commenting the installation code to de-activate it, you can start the app anytime. Start it either by selecting the whole code and hitting control + enter or by pressing the button “Run App”.
Now you should see the dialog box “DD User interface” if everything went fine:
Explanation of the contained files and folders in the downloaded repository
Files
-
app.R : the source code of the shiny application.
-
config.txt : This feature is not important for now. In the future, the user can give the values automatically to the software through this file.
-
start_dd_app.R : Open and execute with RStudio for starting the app.
-
README.md : Additional information.
Folders
-
data :
-
input : Your scanned book pages go in here
-
output : output for all modules (map cropping, pixel classification, georeferencing). The output of template matching can be found under /data/output, the output of legends template matching can be found under /data/output/classification/matching and the output of filtering can be found under /data/output/classifcation/filtering. The final georeferenced file is under /data/output/georeferencing.
-
templates: Template files created with the Digitizer for map cropping and detecting legend elements on maps. Also Ground Control Points for georeferencing go in here. This is important as the modules require template files and ground control points to run successfully. The templates for map detection should be stored under /data/templates/maps and the templates for legends template matching (pixel classification) should be stored under /data/templates/symbols. The ground control points should be stored under data/templates/geopoints.
-
-
src : The source code of the application.
-
www : Layout for the application.